Easy Ornament Decorations

Any time there is a holiday, teachers are looking for fun ways to decorate their classrooms.  Over the Christmas holiday, I helped my daughters class make these ornaments with their photos on them.  You could replicate this ornament for ANY holiday!

086

I used glitter foam cutouts shaped like a Christmas ball, but you could create these with any shapes.

045

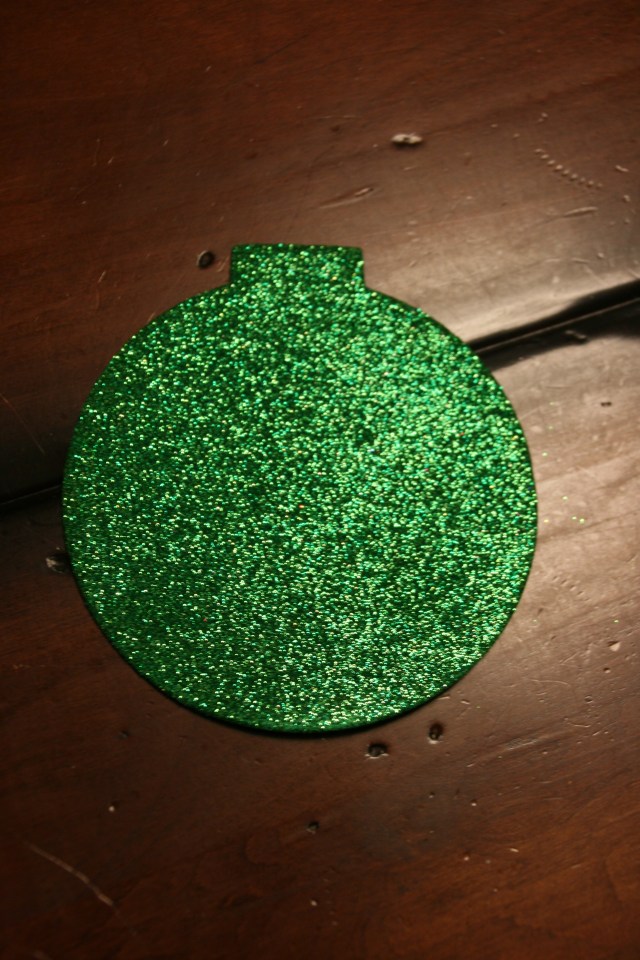
Use a paper punch to create a hole in the cutout.  I used a scalloped circle for the Christmas ball, but you could use a heart punch to create a Valentine’s Day ornament.

Glue festive scrapbook paper to the back so that it covers the punch hole.  Be sure to cut the paper so it isn’t larger than the cutout.

Punch a small hole at the top and thread string through it to create a hanger.

086

Add a picture and the date with glitter glue and you have a festive ornament.

Happy creating.

“Wonder what I will come up with next”…

Using Keys for Decoration

I had so much fun using keys on the Valentine’s Day jars.  I found some additional keys at Michael’s crafts that I fell in love with…literally.  My mind started racing with all of the fun things that I could do with the keys!  I think I came up with some pretty awesome stuff.  Keep reading to see what I did.

IMG_20160126_110622_470 (1)

I purchased several rustic picture frames and scrapbook paper.  I removed the glass from the frames, cut the paper to fit in the frames, and added the keys.

143

This was the easiest one of all.  I added scrapbook paper that looks like barn wood.  When I hang the frame on the wall, I will hang the large key slightly higher, so that it hangs in front of the frame.

I found this darling scrapbook paper that has numerous keys on it…how appropriate!  The keys came on the ring, so this was easy to assemble.  I tied jute onto the key ring, and draped it through the frame, all the way to the back, then closed up the back of the frame.  I tied a knot at the top of the jute so that it doesn’t slip.  Notice the frame has it’s own “key ring” at the top.

This metal frame is so awesome.  It looks so old and rustic!  I used scrapbook paper with a globe on it.  These small keys are glued onto the paper with E6000 glue.  I think this might be my favorite one!

This is another rustic metal frame.  I off centered the scrapbook paper from left to right for interest.  I hung the key with jute and draped it through the frame, as I described on the frame with the “key ring”.

I had so much fun that I think I need to find more keys!!!  I know you will enjoy this simple craft.  Now I need to figure out where to hang them in my house.

Happy hanging…

“Wonder what I will come up with next”…

Valentine’s Day Decoration

Tis the season for LOVE…

Last year, I did a blog post on how to make these heart decorations.  I added a flower embellishments this year and wanted to share.

082

084

083

For a recap: I painted wood squares and wood hearts.  I glued them together with E6000 glue.  On some of them, I included a layer of burlap with tacks.

This year, I added the flowers.  I think the flowers finish off the decoration just perfectly.  Add a hanger to the back, and you have yourself a simple Valentine’s Day decoration.  If you don’t have an official hanger, you can always nail a pop tab from a can to the back.  They work amazingly well as a hanger.

Happy Valentine’s Day…

“Wonder what I will come up with next”…

MORE scrapbook paper initial art…

On May 5th, I posted the “how to” for these, but I have created more since then and thought I would share.  They are so easy to make and the possibilities are endless!!!  They make GREAT gifts!  I am using them for end of the year teacher gifts!

046

Here, I used corrugated steel letters to create a last name.

001002

Both of these have similar vintage paper.

003004

Perfect for a music teacher…

005

I thought this wooden block paper was great for a preschool.

006

I used this paint paper for an art teacher.

I hope these give you more inspiration and ideas for special people in your lives.  As I mentioned before, the possibilities are absolutely endless!!!

Happy creating…

“Wonder what I will come up with next”…

Framed Initial Art…

019

A few weeks ago, I posted a similar idea using scrapbook paper as the background.  Here, I glued fabric to a cut piece of mat board and created a fantastic piece of art for a friend who LOVES all things Paris!

054

Start by painting a wood block letter.  You can either use spray paint, or brush on the paint.

013

Cut the fabric approx 2 inches larger than the piece of mat board on each side.  Spread Tacky glue on the mat board and carefully place the fabric on the glued side.  Be sure to center your fabric design and make sure that it is not sideways.  Smooth the fabric with your hands to ensure there are not any wrinkles in the fabric.  Do not use a quick dry glue…it makes it very difficult to maneuver the fabric once it touches the glue.

015

Turn the piece over and fold up the sides.  Glue the folded sides.  Make sure they are pulled snug.  After all 4 sides are glued, I added packaging tape to ensure the edges of the fabric would adhere to the mat board.

016

Remove the backing and glass from the frame.  Place the mat board into the frame, and close off the back.

019

Glue the painted letter in the center of your mat board.  I used E6000 glue for this.  Let dry, wrap, and give to a friend!  This is a very easy way to personalize a gift for someone special!

Happy framing…

“Wonder what I will come up with next”…

Simple lighted sign…

032

Since I am darn near “MRS. CLAUS”, it is only fitting that I have my own lighted sign in our front yard.  These signs are so easy & simple to make, you will ALL want your own!

023024

Start with a piece of plywood.  Draw on the wood what you would like the sign to say.  Be sure to space things evenly and make the letters the same size.  Use a drill to drill holes over where you have drawn the letters.  Leave enough space between holes so the holes don’t connect.  Use a drill bit size that will accommodate the size of Christmas lights.  After the holes are drilled, paint the wood with a dark color.  You don’t need to paint it perfectly.  Spray paint will work just fine.  Once the paint has dried, take a string of Christmas lights and push the lights through the holes.  Plug it in and you have your very own lighted sign.

032

Happy lighting…

“Wonder what I will come up with next”…

Simple, but unique ways to decorate the bottom of your trees…

I like using traditional tree skirts on several of my Christmas trees, BUT, having 11 trees in my house, I feel the need to create fun “tree bottoms”!

078

I used brown hand towels to create “sand” on my “under the ocean” tree.  I then placed star fish, sea shells, and a lobster on top of the towels to complete the “Ocean” themed tree.

081085

Both of these trees are covered in mesh, so I continued the mesh at the bottom of the trees.  I added areas of ornaments on the mesh for the pink tree.

054

This is the simplest tree bottom of all!!!  I bunched up white cotton felt under the tree, then placed 4 LARGE bling ornaments on the felt,

056

Here I used white cotton felt bunched at the bottom and topped it with beaded garland strands.

058

A traditional gold tree skirt covered with bunched up mesh, topped with gold strands of beads.

068

A traditional tree skirt topped with bunched up mesh.

All of these things make the tree look so beautiful from top to bottom, before you put your gifts under the tree!  AND, OF COURSE, you want to make your gifts just as beautiful and coordinate the wrappings with the tree they are placed under!

Happy tree decorating…

“Wonder what I will come up with next”…

Unique tree toppers…

I don’t know about you, but I still like using a traditional tree topper…for a couple of my trees.  BUT, I have 11 trees decorated in my house, so a little diversity is so fun!

052

This tree has been named “SUGAR RUSH”!  It is filled with all sorts of sweet things, ie candy canes, ice cream cones, donuts, cupcakes, cakes, gingerbread houses, lollipops, etc.  It is the favorite tree of many friends!

057

This tree is red, white, & silver, with stars & snowflakes.  A simple star and some bling top this tree.

062

A traditional Santa tree topper with a few sprigs of cream & gold top this tree.  The rest of the tree is filled with lights and mesh…That’s all!

065

A mauve bow tops my burgandy, mauve, silver & gold sugared fruits tree.

069

A large flower with sprigs of beads top my blue & platinum tree.

077

Seaweed & green kelp looking things top my “under the ocean” tree that is in my kids “under the ocean” themed bathroom.

080

3 large purple and green flowers and purple bead sprigs top my purple and lime green tree.

083

Hot pink balls and green/hot pink sticks top my shoe & purse tree.

So you see, decorating Christmas trees can be so much fun!  I still cannot decide which tree is my favorite!

Happy decorating…

“Wonder what I will come up with next”…

Fun and Festive SIMPLE Wreaths…

Who said decorating a wreath had to be complicated?  You can create very SIMPLE wreaths with some unique touches!

048

Add a large shatter proof ornament with a simple bow.  Hang the bow onto the wreath hanger.  DONE!  SIMPLE AND FESTIVE!!

066

Group several shatter proof balls together with wire and attach to the wreath, just under the bow.  SIMPLE AND FANCY!!!

074

Use an extra fancy wreath hanger, and add a hanging angel, or whatever you choose.  SIMPLE AND SWEET!!

075

Hang a sign from the wreath hanger and add a bow to the bottom of the wreath.  SIMPLE AND CUTE!

086

Let your kids hang a wreath on their bedroom doors and decorate it with non breakable ornaments.  Let their creative juices flow!  PRICELESS AND ADORABLE!!!

Happy decorating…

“Wonder what I will come up with next”…