Valentine’s Day Jar Decorations…

February is almost here.  I can’t believe how quickly January has blown by!  It seems like just yesterday, we were preparing for Christmas.

In preparation for February, I have started making Valentine’s Day gifts for my daughter’s teachers.  I love making gifts for teachers!  They are one of the most under appreciated people in our children’s lives.  They have so much influence on the minds & emotions of our future leaders, yet many parents take them for granted.  I am always proud to shower them with EXTRA LOVE!

Supplies needed are: Glass jars, paint, foam paint brushes, ribbon, twine, heart charms, keys, & 3-D heart stickers.

I have been saving glass jars for years, and they always come in handy when I am ready to create something.  For this project, I used several Bertolli pasta sauce jars.  These jars are great because they have character to them.

I started by painting the outside of the jars in Valentine’s Day appropriate colors.  I used containers of paint samples, so that I didn’t need to invest a lot of money in paint.  You can find inexpensive paint samples at Target, Lowes or Home Depot.  I used red, pink, lavender, and beige paint.  Once painted, I turned the jars upside down and let them dry for a couple of days.

I had quite a lot of red & beige burlap ribbon left from Christmas, so I decided to try using it.  On the red jars, I stacked both colors of ribbon for added texture.  I only used red ribbon on the other colors of jars.

img_20190125_115534795

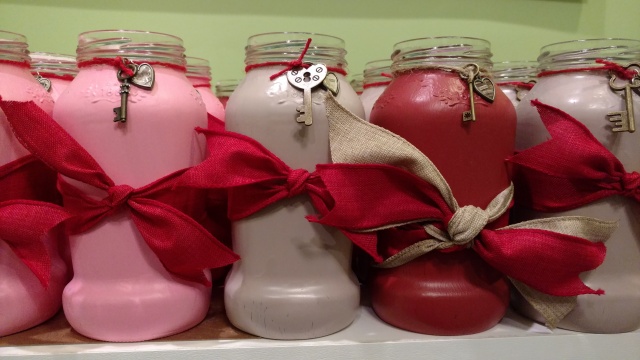
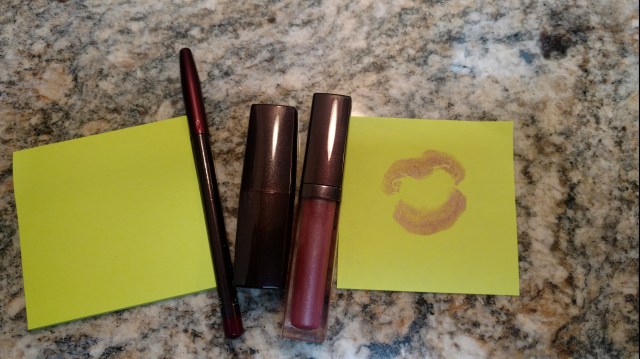
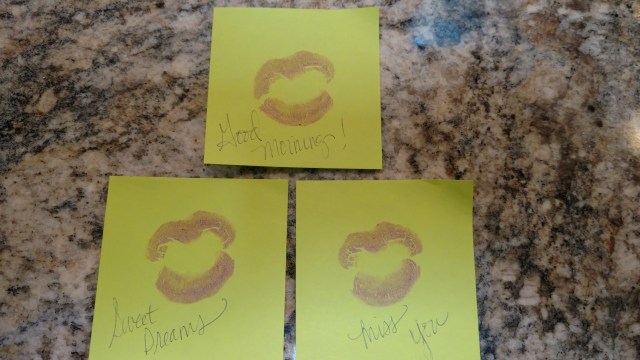
I added heart shaped charms that I purchased at Joann’s and keys that I purchased at Michael’s Crafts, attaching them with red, pink, and natural twine.  Very simple to make, yet very festive.

I also had some 3-D heart stickers that I thought would be fun to work with.  I tried several styles, as you can see.

img_20190125_115057445_hdr

In all, I created over 35 jars that I will fill with Hershey’s Kisses and Hershey’s Hugs.  I will hand these out in a few weeks, spreading lots of LOVE in the process.  I mean, isn’t that what Valentine’s Day is all about?  Spreading LOVE?  I think so!!!

Happy Valentine’s Day!

“Wonder what I will come up with next”…


A Different Use for Crates…

In my last post, I showed you a clever headboard idea in my spare bedroom.  In this post, I will show you how I used crates as wall decor.

img_20190122_115824841

As I was decorating the spare bedroom, I wanted something unique on the walls.  I found these gray crates at TJ Maxx and fell in love!  They came in 3 sizes, so I bought them all.  I used the smallest size as a “platform” for a light next to the bed.  I turned it upside down on the night stand, then placed the light on top.  This allowed the light to be higher, making it easier for guests to read in bed.

The remaining two crates, I hung on the wall in a “nook” cut out next to the closet.  The extra depth of this space meant the depth of the crates wasn’t an issue.  I used the crates as shelves, placing some decorative items inside and on top.  I even hung a couple of items from the inside top, for variety.

The overall effect was exactly what I was looking for!

img_20190122_115824841

Happy decorating!

“Wonder what I will come up with next”…

Clever Headboard Idea…

img_20190122_115757125

I don’t know about you, but I like to be creative with decorating ideas.  I was redecorating my spare bedroom, and was struggling with headboard ideas.  I didn’t want a traditional headboard, yet I wanted something cost effective.  I was shopping at Kirklands, and found these metal & wood pieces of art.  They had two, so I bought them.

I hung them side by side, so that they bottom of the frames rest just below the height of the bed.  They look amazing!  Quite a statement piece in the spare bedroom, yet so simple to create!

Happy decorating!

“Wonder what I will come up with next”…

Unicorn Birthday Party…

imgsvr (20)

I remember as a young girl falling in love with unicorns and rainbows!  I loved all of the pastel colors, and of course the glitter that was associated with them.  That being said, when my younger daughter wanted to have a unicorn themed birthday party, I was    ALL IN!!!  My mind immediately started whirling with ideas for the decorations!

I started with table decor, and found these adorable plates, napkins, & center pieces at Party City.  The gold square chargers have glitter specks and were a perfect addition.

I made “tails” out of streamers, and tied them to the backs of the chairs.  Of course, the birthday girl got a larger “tail” that included a tulle bow.

Using the same color streamers, I added a little more color with streamers hanging from a beam in the party room.

imgsvr (8)

I found some fun and unique “unicorn names” on Pinterest, so I printed them for the girls to declare their personal “unicorn name”.

I was SOOOOO excited when I found these ceramic unicorns at TJ Maxx.  The pink one is a bank and the white one is a planter.  They were a perfect addition.

At the party entrance, I created a cloud that appeared to be raining.  I used white tissue paper and two iridescent doorway hanging decorations.

imgsvr (18)

Another MUST for a fun party is a photo backdrop.  I created this one with iridescent doorway hanging decorations, then added streamers.  On top, I hung tissue paper flower balls, and the final touch was a sign that read “I believe in unicorns” that I purchased at Party City.  I placed two balloon bouquets on the floor for added color.  During the photo booth pictures, I dumped large trash bags full of blown up balloons on the girls.  They had a blast playing with the balloons.  This created MANY fun photo opportunities!

We played a few games: pin the horn on the unicorn, and a ring toss onto the horn of a unicorn.

A birthday party wouldn’t be complete without dessert!  My daughter wanted an ice cream cake, so I make two unicorn ice cream cakes.  I used a frosting and gold sugar covered ice cream cone as the horn and thin blonde Oreos that I cut into triangles for the ears.

imgsvr

When I created the invitations, I found glitter gold unicorn silhouettes online that I printed.  I used the same silhouettes on the party favor gift tags and unicorn name lists.  I included a fun quote that said, “In a world of horses, be a unicorn”.

I had just as much fun planning this party as the girls had attending it!

imgsvr (20)

Happy birthday party planning!

“Wonder what I will come up with next”…

A GIANT Bean Stalk…

imgsvr (43)

My daughter’s class was reading “Jack and the Bean Stalk”.  As they were reading the book, they were also learning about seed germination.  They started growing their own plants as projects.  These projects, and the process each child completed, were then displayed on poster boards and available for “show” to the parents at open house.

Since this project stemmed from the book, the teacher asked me to create a GIANT BEAN STALK in her room, also to be on display during open house.  OF COURSE, I said YES!!!  Then I began the task of creating the bean stalk in my head.  OH WHAT FUN it is to be a parent at times like this!!!

I started with long strips of green paper.  I measured the distance from the ceiling to the shelf where the bean stalk would rest, and added a few feet.  I used the paper on rolls that all schools have on hand.  I twisted the long strips of paper to create “cords”.  I then twisted the “cords” together and this became the base, or trunk.  I stapled the “cords” in several places so they would stay in together.  I attached the top of the trunk to a rod in the window sill using  large paper clips and binder clips.  The binder clips attached to the top of the trunk, then I looped the paper clips through the metal loop on the binder clip.  The paper clip was then looped over the rod in the window sill.  I taped the trunk to the window in a few places on the backside of the trunk, for stability.

Next, I twisted in more “cords”, but I allowed these to have BIG loops and gaps, so they were loose around the trunk.  I stapled these “cords” where they intersected the trunk.

imgsvr

The next step was creating leaves for the bean stalk.  I used 3 different colors of green construction paper, and cut out a simple leaf shape.  I added lines with a black Sharpie for leaf “definition”.  Then I stapled the leaves all over the trunk.  I added numerous leaves to the top to hide the mounting in the window sill.

Using the rolled green paper, I created “bean pods”, and drew circles with black Sharpie.  I strategically stapled the pods onto the trunk.

This project only took about 2 hours from start to finish, but the impact was HUGE!!!  The kids LOVED their bean stalk and several other teachers at the school commented on it, as well.

imgsvr (43)

Have fun creating your GIANT bean stalk.  I wouldn’t recommend trying to climb it!

“Wonder what I will come up with next”…

Gift Tags from Cards…

img_20190105_152044884

A couple of weeks ago, I posted about repurposing used Christmas cards.  You can also do this with birthday, anniversary, thank you, or any kind of card you have received.  Here I show a Dr. Seuss birthday card that I created a gift tag from.

Supplies needed: used cards, cardstock, paper cutter, glue stick, hole punch, & thin ribbon.

Cut the cardstock slightly larger than the card, glue them together, punch a hole in the corner, and tie it onto a gift.  It’s that simple!

img_20190105_152054359-1.jpg

Be sure to coordinate the wrapping paper and ribbon with the gift tag, for the optimal effect.

Happy cutting.

“Wonder what I will come up with next”…

Frames with Christmas Balls…

OMG!!!  I had the MOST FUN making these gifts for my kids teachers!  Based on the reactions from the recipients, they REALLY LIKED them also!

I realize this is a Christmas decor/gift idea, but I wanted to post it now so that you could be on the hunt for after Christmas sales on ball ornaments.  Now would be a great time to collect the ornaments and make gifts for Christmas this year.  Be sure to purchase balls with color, not just gold & silver, for the perfect effect.

Supplies needed for this project: frames, ball ornaments, wood initial, ribbon (both thin & wide with wire), spray paint, E6000 glue, short zip ties.

For the frames, you can find old beat up ones at yard sales for quite inexpensive.  I also made several from scrap wood that we had at the house.  Either way, spray paint the frames in fun Christmas colors.  Any kind of spray paint will work, so find the least expensive one you can.

Once the frames are dry, tie THIN ribbon strands around the top piece of wood, letting 7 total strands of ribbon hang all the way to the bottom.  This gives you extra ribbon so you can have the perfect length of each ball dangling.  You will want to mix up the lengths as you create your piece of art.  Next, tie the balls onto the ribbon and adjust the ribbon as necessary to get the appropriate varying lengths.  Be sure to triple knot the ribbon on the balls.  Cut the excess ribbon.

img_20190105_160023029

Paint the wood initial in a coordinating color.  Let dry.  Using E6000, glue the ribbon onto the back of the initial and let glue dry.  You may have a better idea on how to attach the initial to the ribbon.  If so, go for it!  Tie the initial on to the top piece of wood, just as you did with the balls.  Adjust the length of the ribbon as necessary.  Once all of the balls and initial are tied on, slide the ribbon to the center of the wood.

For the bow, use a coordinating wired ribbon and create a large full bow.  For bow making steps, look under the section of gift wrapping in my blog.  Attach the bow to the center of the top piece of wood.

To create a hanger on the back, I used small zip ties that I purchased at The Dollar Tree.  I created a small loop around the back of the ribbon, where it is attached to the frame.  Leave the zip tie loop large enough for a wreath hanger to fit through it.  By attaching the zip tie to the ribbon, it allows the ribbon to be shifted as necessary for centering, to the left or right, along the frame when hanging the frame on the wall.

img_20190105_160527730

You are now ready to hang your frame, or gift it to someone special.

Have fun creating!!!

“Wonder what I will come up with next”…

Lip Notes…

Do you, or a loved one travel often?  Show them how much you miss them with “Lip Notes”.

How many of you use lipstick?  Of those, how many “blot” after applying?  You can create “Lip Notes” as you blot.  It’s that simple!

Supplies needed are: Sticky notes, Lipstick, and, of course, your lips.

img_20190104_134627317.jpg

I create “Lip Notes” every time I apply lipstick.  I collect them in my bathroom cabinet so I am armed and ready each time I travel somewhere without my family.

img_20190104_134729699

Right before leaving on a trip, I secretly hide my “Lip Notes” all over the house for my family to find.  I started doing this when my kids were little so they would know I was thinking about them and sending them kisses while I am away.  I even put notes in their suitcases when they are going on a trip without me.

Some of my favorite places to hide them are: on the mirror, on their pillows, by their toothbrushes, on the coffee pot, in their lunch boxes, in a clothes drawer, and in their shoes.  Feel free to be creative with your hiding places!

It doesn’t take long to accomplish, but the end result for your family is ever lasting!

Happy Blotting!

“Wonder what I will come up with next”…