“Candyland” Party Decorations

Oh my!  This event gave me the best “Candyland Dreams”!!!  I created decorations for my daughters carnival and had the time of my life!!

Let’s start with the “GRAND” entrance…

005x

007x

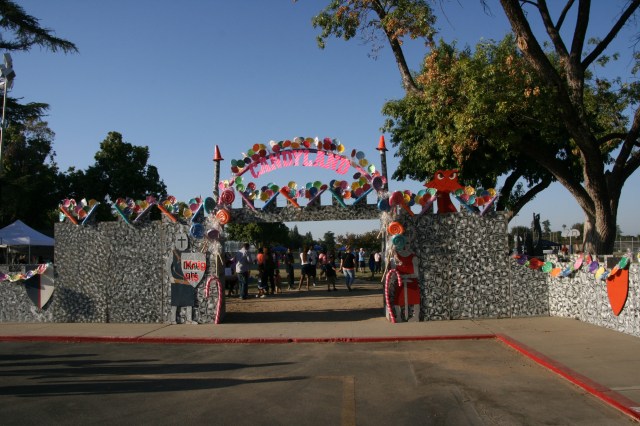
There is so much going on here that it will take me a few minutes to describe all I did.  The arch was created from pool noodles and pvc pipe.  I then used duct tape to attach the “Candyland” letters that I cut out of hot pink poster board and striped with masking tape.

I created “Lollipops” with paper plates, bamboo skewers, ribbon and gallon size twist top plastic bags.  I stuck the skewers into the pool noodle arch to make it look like lollipops standing on the arch.

I cut pool noddles into thirds and covered them with celophane and tied the ends with ribbon to create “Candies”.  Then I wedged the paper plate lollipops behind the tube candies.

I made large “Lollipops” with pool noodles that I rolled up and covered with celophane gift bags.  I then used a wrapping paper roll as the “stick”.

009x

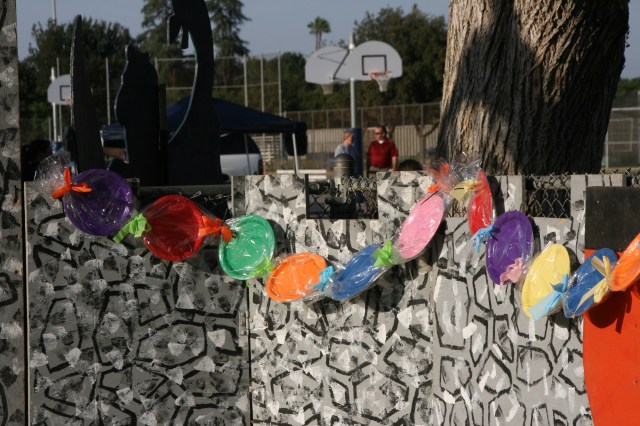
I draped “Candy Streamers” made from paper plates, plastic table cloths cut into strips, and celophane, along the front walls.

010

We spray painted the grass with squares to look like the Candyland game board.  The paths led to different activities such as cake walk, silent auction, and inflatables.

020x

These ice cream cones were made from brown paper and pillow stuffing.  I rolled up the paper to form a cone shape and placed a large wad of stuffing on top.  Just to make it extra fun, I wadded up red paper to create a cherry, and glued sticks from my yard as the cherry stem.  Then I wrapped a box with pink wrapping paper, cut out wheels from black paper, and glued on a smaller ice cream cone to create an ice cream cart.

025x

With the help of other parents, we turned the covered table area into a “Gingerbread House”.

We taped on brown scalloped paper and added giant candy canes made from pool noodles striped with masking tape.  We taped on tissue paper covered toilet paper rolls that looked like candies, and paper plates covered in celophane that looked like peppermint candies.

028

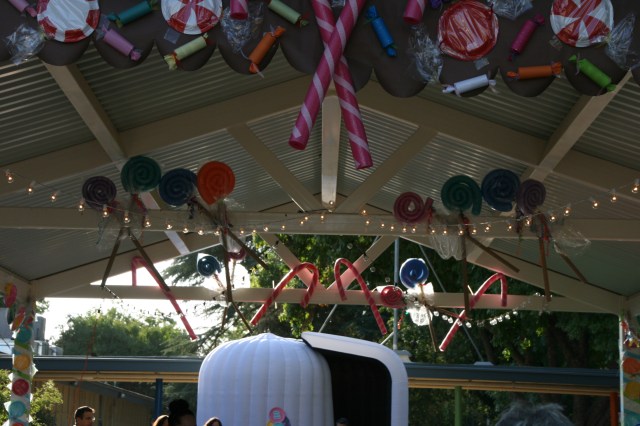
We added more giant lollipops and candy canes under the roof.

032

We draped more of the paper plate streamers on the inside of the roof.

029

We wrapped the poles with streamers and taped on paper plate lollipops.  This created the cutest darn gingerbread house ever!

There was fun had by all and the decorations were talked about for weeks.  It made my heart so happy that everyone enjoyed the festive decorations and all the hard work.

Happy candy making!

“Wonder what I will come up with next”…

Easy Ornament Decorations

Any time there is a holiday, teachers are looking for fun ways to decorate their classrooms.  Over the Christmas holiday, I helped my daughters class make these ornaments with their photos on them.  You could replicate this ornament for ANY holiday!

086

I used glitter foam cutouts shaped like a Christmas ball, but you could create these with any shapes.

045

Use a paper punch to create a hole in the cutout.  I used a scalloped circle for the Christmas ball, but you could use a heart punch to create a Valentine’s Day ornament.

Glue festive scrapbook paper to the back so that it covers the punch hole.  Be sure to cut the paper so it isn’t larger than the cutout.

Punch a small hole at the top and thread string through it to create a hanger.

086

Add a picture and the date with glitter glue and you have a festive ornament.

Happy creating.

“Wonder what I will come up with next”…

Toilet Paper Roll “Crackers”

002

These are SO darling!  I have made several versions of these over the years.  I thought I would share how easy they are to create, yet how cute they are.

004

I used both decorated tissue paper, solid tissue paper, and paper doilies that I purchased at the Dollar Tree.  Be sure to cut the solid tissue paper wider that the decorative one, so that it will stick out on the ends.

Once the paper is cut, place the decorative paper so that it creates an edge, see picture 1.  Then flip the paper over.  Fill the toilet paper roll with fun stuff!  I have filled them with candy, rings, bracelets, pens, stickers, etc.  Place the toilet paper roll in the center from left to right, and at the far side of the paper, not near the edge you created.

007

Carefully roll up the toilet paper roll and tape it at the edge.  Next, roll the toilet paper roll over to the front and tie off the ends with curling ribbon.

Then feel free to add extra decor.  I used stickers to spell out the recipients names.

These make fun gifts for kids, and are an easy craft for kids to make.

Happy rolling!

“Wonder what I will come up with next”…

Simple Valentine’s Day Decorations

I have seen 3-D heart decorations on Pinterest and I LOVE them!  I decided to give them a try with cutout foam hearts that I purchased at the Dollar Tree.

This would make a fun kids craft.

011

You will need heart cutouts (3 for each decorations), something to decorate the hearts with…I used streamers, yarn or string, and a glue stick.

The first thing you will need to do is decorate the hearts.  I chose to use streamers, but you could decorate the hearts with anything of your choosing.  If you use glitter glue, you will need to let it dry prior to gluing together the hearts.  Next you will glue half of 2 hearts together.  I used a glue stick because it stays together quickly.

012

At this point, you will place your string or yarn into the crease of the 2 hearts.

013

Be sure the yarn is centered at the very top center of the heart, where it forms a “v”.  Next, you will put glue on the entire 3rd heart, and glue it to the open area of the 2 hearts already glued together.  This will form the 3-D effect.  Be sure to line up the edges and press firmly at the center point.

Let your hearts dry and hang them for decoration.  Have fun!

Happy Valentine’s Day!

“Wonder what I will come up with next”…

Chocolate Dipped Spoons

When it’s cold outside, I’m in the mood for hot chocolate!  Some prefer coffee.  Either way, a fun treat to add to your warm beverages are chocolate dipped plastic spoons.  For the holidays this past year, I dipped spoons and added sprinkles, crushed peppermint, and mini marshmellows.  I coupled the spoons with Keurig cups and created some awesome gift baskets for special people in my life.

012

These spoons only have sprinkles, but you get the idea.  I used the Wilton melting chocolates.  Immediately after dipping approximately 6 spoons, I added the sprinkles, marshmellows, or peppermint.  Then I continued dipping.  I let them dry on parchment paper for several hours.

014

Since the “little” things are so important when creating gifts for people, I individually wrapped each spoon in a fold top sandwich bag.  I used bakers twine to tie it off and included a fun sign that read “Enjoy” or “Yum” to each spoon.  I propped the spoons up in a box that I wrapped with wrapping paper, and added a bow.  For some of the gifts, I propped up the spoons in the basket with the Keurig cups.  The spoons were a HIT!!!

012

Happy dipping…

“Wonder what I will come up with next”…

“Out of This World” Basket Decorations

If you have a child in school, you can appreciate the amount of work that goes into planning the school carnival.  I usually assist in different ways, one of which is wrapping the classroom silent auction baskets.  Since I LOVE wrapping any gift, this is a fun event for me.  The theme this year at one of my daughters school was

“Just Imagine a Galaxy Far, Far Away”

I had fun using planets to make the baskets festive.  Perfect timing with the new Star Wars movie!

139

If you saw my blog post on how to create amazing gift baskets, then you know how to assemble the items into the basket.

To create the look that the planets are in the air, I used black & dark blue pipe cleaners and taped them to the back of the planet & star die cuts.  I then tied the bottom of the pipe cleaner onto the basket with curling ribbon.

Creating these gift baskets was an “Out of this world” experience!

Happy creating…

“Wonder what I will come up with next”…

Using Keys for Decoration

I had so much fun using keys on the Valentine’s Day jars.  I found some additional keys at Michael’s crafts that I fell in love with…literally.  My mind started racing with all of the fun things that I could do with the keys!  I think I came up with some pretty awesome stuff.  Keep reading to see what I did.

IMG_20160126_110622_470 (1)

I purchased several rustic picture frames and scrapbook paper.  I removed the glass from the frames, cut the paper to fit in the frames, and added the keys.

143

This was the easiest one of all.  I added scrapbook paper that looks like barn wood.  When I hang the frame on the wall, I will hang the large key slightly higher, so that it hangs in front of the frame.

I found this darling scrapbook paper that has numerous keys on it…how appropriate!  The keys came on the ring, so this was easy to assemble.  I tied jute onto the key ring, and draped it through the frame, all the way to the back, then closed up the back of the frame.  I tied a knot at the top of the jute so that it doesn’t slip.  Notice the frame has it’s own “key ring” at the top.

This metal frame is so awesome.  It looks so old and rustic!  I used scrapbook paper with a globe on it.  These small keys are glued onto the paper with E6000 glue.  I think this might be my favorite one!

This is another rustic metal frame.  I off centered the scrapbook paper from left to right for interest.  I hung the key with jute and draped it through the frame, as I described on the frame with the “key ring”.

I had so much fun that I think I need to find more keys!!!  I know you will enjoy this simple craft.  Now I need to figure out where to hang them in my house.

Happy hanging…

“Wonder what I will come up with next”…

Valentine’s Day Decoration

Tis the season for LOVE…

Last year, I did a blog post on how to make these heart decorations.  I added a flower embellishments this year and wanted to share.

082

084

083

For a recap: I painted wood squares and wood hearts.  I glued them together with E6000 glue.  On some of them, I included a layer of burlap with tacks.

This year, I added the flowers.  I think the flowers finish off the decoration just perfectly.  Add a hanger to the back, and you have yourself a simple Valentine’s Day decoration.  If you don’t have an official hanger, you can always nail a pop tab from a can to the back.  They work amazingly well as a hanger.

Happy Valentine’s Day…

“Wonder what I will come up with next”…

Mehndi Party Decorations

In my last post, I showed you how to make a festive invitation for a Mehndi party.  Here, I will show you all of the fun decorations that I created for the party.

I started with a color scheme of orange/yellow, turquoise, green, and salmon.  I purchased colored mason jars at Joann, which saved me tons of time in painting jars!  I used gold puffy paint and decorated the outside of the jars to create lanterns.  I placed lanterns on gold chargers and added groups of bangle bracelets tied with colorful ribbons.  Signs on the tables let guests know to wear the bangle bracelets.

Under the gold chargers and jar lanterns was fabulous rosette fabric.  We had bar top tables with white tablecloths, topped with the rosettes.  I used plastic table cloths cut in strips to tie the bottom of the white table cloths.  I also used these strips to create tassel banners.

009

019

Every Mehndi party needs a gold beaded curtain for extra bling!  I hung these at the entrance to the party, and draped fabric with the beads to create an amazing entrance.  I also hung 3 lanterns in the center.

010

015

On the food table, I draped fabric and overlapped it on boxes to create height.  We had Indian food in trays on the table.

029

With some extra rosette fabric I had, I covered a box and tied it with the plastic table cloth strips to create a riser for desserts.

The party would not have been complete without henna and bindi dots!

Happy party planning!

“Wonder what I will come up with next”…

Mehndi Party Invitations

044

Any good party starts with a festive invitation to get the mood going.  My friend wanted to have a 40th birthday party with an Eastern Indian Flare, so we had an Americanized Mehndi party.

To create these invitations, I started by printing the details in an orange/red color and stamped the swirls in turquoise.

To add some dimension, I used puffy paint to add dots onto the swirl stamp, and finished with adhesive rhinestones.

046

Let the paints dry, then use a glue stick to attach the festive cardstock on the back.

044

Let the party begin!!!

Happy planning!

“Wonder what I will come up with next”…