How to Create an AMAZING Gift Basket

Have you ever wondered how people create the most amazing gift baskets?  They look professional, yet were done by an amateur.  I will show you how simple the process is and then you can create AMAZING gift baskets too!

054

Start with a basket and a magazine that you no longer want.  You don’t want to use newspaper because the ink will rub off onto your hands.  Wad up magazine pages until you fill the majority of the basket.  This will become your base.

055

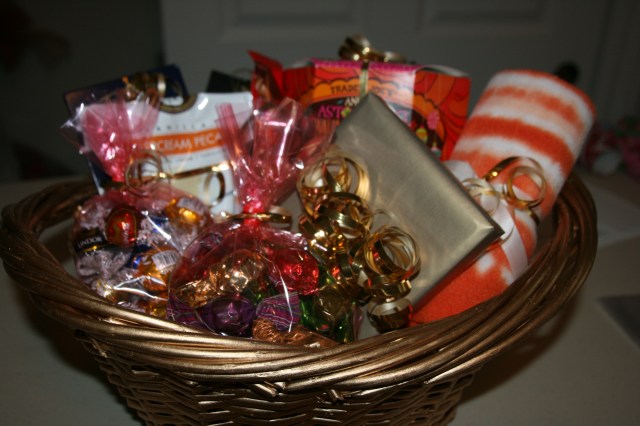
Next, you will place the items in the basket, on top of the wadded up magazine.  Place taller items in the back.  Stagger the items so you can visually see each of them.

Now you will put in the basket filler.  Only put it where you can see the wadded up magazine.  Push the filler down into the basket and slightly under the items.  This will save you from using more filler than you need.

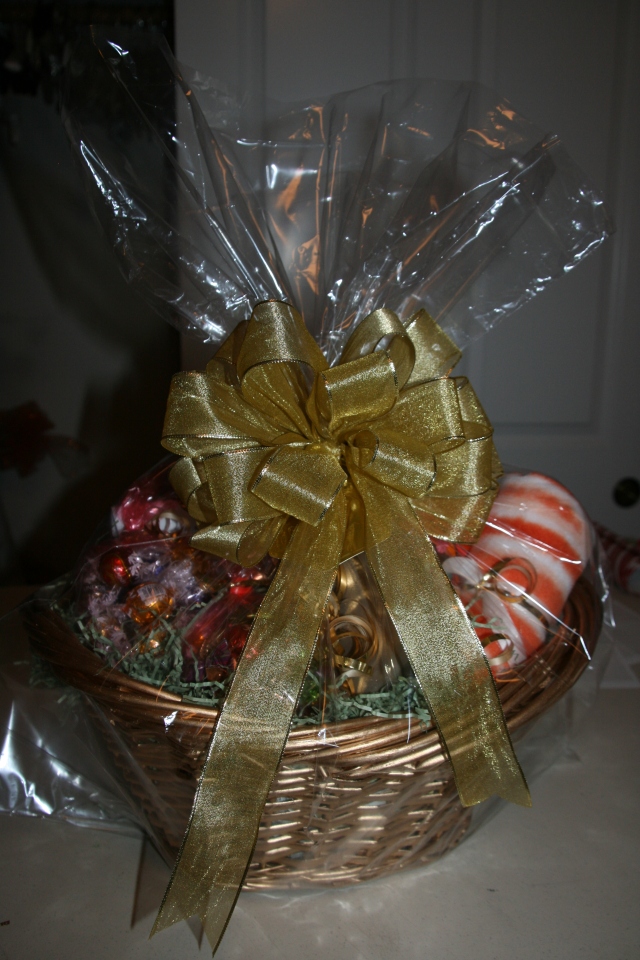
I have found that using celophane bags is so much easier than using celophane rolls.  I usually purchase bags at the Dollar Tree.  You can get a set of 2 for…you guessed it…$1.00!  Place your basket in the celophane bag.  Be sure to center in at the bottom.  Pull up on the bag tightly until all of the slack is gone.  Use a twist tie or a piece of thin ribbon  to tie a knot at the top.  Tie on your gift tag and you are ready to attach an amazing bow!

060

Congratulations!  You can now make amazing gift baskets!  Have fun!

“Wonder what I will come up with next”…

Elegant Fabric Covered Pumpkins

These are so easy to make, yet they are absolutely gorgeous!

https://www.youtube.com/embed/ZC2qqAano-A“>youtube “how to” video

169

They will make your Thanksgiving table look elegant!

Happy Thanksgiving!

“Wonder what I will come up with next”…

Halloween Jar Lanterns…

I absolutely LOVE crafting with jars!  I save them all year long!  I wanted to make some unique Halloween lanterns for teacher gifts and found the perfect lace like ribbon at Hobby Lobby and transfer decals at The Dollar Tree.  I purchased the spiders at the 99cent store.

171176

To create these fun jars, start by applying the transfer decals.  They go on very easily!  Follow the directions on the package.  Be sure the transfer is completely adhered to the jar before pulling off the backing.

155

Next, glue on the lace like ribbon.  I used Tacky glue.  Lastly, glue on the spiders.  I started with Tacky glue, but found that E6000 glue worked better.  Finish with a knotted ribbon around the top of the jar.

172173174

The possibilities are endless!  I even created some without the lace ribbon, for a more masculine look.

170

Happy creating…

“Wonder what I will come up with next”…

Halloween Decor…

I created the most fun display of “Potion” bottles this year.  I wanted to share with all of you.  Now would be the best time to shop for these types of items as the stores clearance out their Halloween decorations!

035040

I found the spell & curses books at TJ MAX and I couldn’t help my self from there on out!  Home Goods had the most incredible supply of poison & potion bottles!

043

Here are the witches to create the “brew”.

045046

I found these darling witch hats at the 99cent store.  They make they perfect “topper” on any lamp!

044

Happy decorating…well…next year anyway!

“Wonder what I will come up with next”…

Halloween Treats…

I apologize that I am getting this to you after all of the Halloween celebrations have finished, but you can save the ideas for next year.

179180

Halloween “Grave Yard” cupcakes

I used Wilton “cookies and cream” sprinkles to create the “dirt”, gummy worms, and skull & bones candy I found at the 99cent store.

182184

Halloween “Bloody Eyeball” cupcakes

I used skull eyeball gumballs that I purchased at Walmart and red icing.  I heated up the icing so it would run as I dripped it onto the cupcakes.

187185

Halloween “Jack-O-Lantern” cookies

Once the cookies were baked and cooled, I used Wilton black gel to create the faces.

Happy baking…

“Wonder what I will come up with next”…

Holiday Gift Spreadsheet. It’s time to start shopping!!!

November is here and it’s time to get SERIOUS about holiday shopping!

How many of you are saying to yourself…”This girl is CRAZY!  It’s ONLY the 1st of November!”  Well, yes, I am crazy, but crazy can be a GOOD thing!  I have attached a spreadsheet that I use to keep track of the gifts I need to buy and the gifts I have already purchased.  If you start NOW…you will enjoy the holiday season SOOOOOOOO much more!!!  I usually start my holiday shopping in August or September.  This allows me to spend less money per month on gifts, spreading the cost out.  I rarely use credit cards to purchase gifts, so I am not left with the post holiday bills to pay.  Starting early also takes the stress off of the buying process.  I aim to be finished shopping by Thanksgiving.  I usually don’t make that goal, but I am usually darn close.  I am not usually out shopping during the craziest weeks in December.  AND…if I am out shopping, it is because I WANT to be shopping, not because I HAVE to be shopping.

On the spreadsheet, there is a column for “Who” the gift recipient is, “Budget” amount, “Spent” amount, and “Gifts”.  In the “Gifts” area, I use the space for gift ideas, and what I have purchased.  I color code the lettering depending on where in the buying process I am.  For instance, “black” letters are for ideas, “blue” letters are for purchased items, and “red” letters are for gifts I have already distributed.  This allows you to keep a very close watch on all of your gift movement.

I dare you to try it “my way” and hope you have a VERY MERRY HOLIDAY SEASON!!!  I ALWAYS DO!!

Happy Shopping…

“Wonder what I will come up with next”…

holiday shopping list

Parisian Bakery Birthday Party…

If you saw my last post, it was the invitations for this birthday party.  Fancy, fancy, and more fancy.

001

As you entered, I had a display with a couple of items of interest, including the “daily specials”.  Since I didn’t have a bodice, I used a floor lamp as a “bodice” to hang a dress from.

003 005

126

In order to create a true Parisian Bakery environment, I prepared numerous Parisian type desserts and displayed them.

127129

Everything from chocolate mousse (pudding) to parfaits

128

I made Nicoise and wrapped them with Eiffel Tower ribbon.  I even had Macarons!

131

To display the cupcakes, I filled apothecary jars with silk flowers and placed clear glass plates on top.

134136

135

I made high heeled shoe cupcakes also and decorated them with an Eiffel Tower charm on top, which was part of the party favor.

138

The table decor was simple…pink, white, & black tulle loosely braided down the center with Eiffel Tower statues in white & black.

139

I posted a similar picture to this back in June.  I made another one for my daughter and displayed it was part of the fancy decor during the party.

155a

I purchased an Eiffel Tower backdrop at Oriental Trading and used it as a photo booth.  The girls had so much fun with the props, including a white board for them to write the reasons they love Paris!  The girls topped off the party with a French lesson!  Magnifique!

Happy partying…

“Wonder what I will come up with next”…

Parisian Bakery Birthday Party Invitations…

053

A fun and festive invitation is the perfect way to invite guests to your party.  It will set the tone long before the party begins.  For my daughter’s 10th birthday, we had a Parisian Bakery themed party.  Of course, Paris is fancy, so the invitations needed to be fancy too.

047

I started by cutting black 8.5″ x 11″ card stock exactly in half.  I printed all of the party details on light pink paper and cut it slightly smaller than the black card stock, leaving about a 1/2″ border along all sides.  I then used a glue stick to glue the pink paper to the black card stock.

048

I stamped a silver Eiffel Tower onto velum that I cut the same size as the black card stock.

049

You can see how fun this looks when the velum is resting on top of the pink and black.

050

Take a single hole punch and evenly space out 2 holes.

051

Thread pink ribbon through the holes with both ends coming up.

052

Tie a pretty bow.

053

You now have a fancy invitation to send to your guests that was quite simple to make.

Happy stamping…

“Wonder what I will come up with next”…

Using floral plastic rolls for gift wrapping…

002

Several years ago, a floral store was going out of business.  I stopped by there to see what they were selling on clearance.  I found these rolls of decorated cellophane that look like lace.  I purchased them in black, navy blue, & forest green.  I had NO IDEA what I was going to use them for, but I figured I would come up with something someday.  Well, that day has come!  I wrapped a white box with the black lace and it was gorgeous!!!

001003

The print on the cellophane gave the gift a very elegant look!  So simple!  Better than a gift bag!!!

Happy wrapping…

“Wonder what I will come up with next”…

MORE scrapbook paper initial art…

On May 5th, I posted the “how to” for these, but I have created more since then and thought I would share.  They are so easy to make and the possibilities are endless!!!  They make GREAT gifts!  I am using them for end of the year teacher gifts!

046

Here, I used corrugated steel letters to create a last name.

001002

Both of these have similar vintage paper.

003004

Perfect for a music teacher…

005

I thought this wooden block paper was great for a preschool.

006

I used this paint paper for an art teacher.

I hope these give you more inspiration and ideas for special people in your lives.  As I mentioned before, the possibilities are absolutely endless!!!

Happy creating…

“Wonder what I will come up with next”…