Clever Headboard Idea…

img_20190122_115757125

I don’t know about you, but I like to be creative with decorating ideas.  I was redecorating my spare bedroom, and was struggling with headboard ideas.  I didn’t want a traditional headboard, yet I wanted something cost effective.  I was shopping at Kirklands, and found these metal & wood pieces of art.  They had two, so I bought them.

I hung them side by side, so that they bottom of the frames rest just below the height of the bed.  They look amazing!  Quite a statement piece in the spare bedroom, yet so simple to create!

Happy decorating!

“Wonder what I will come up with next”…

Unicorn Birthday Party…

imgsvr (20)

I remember as a young girl falling in love with unicorns and rainbows!  I loved all of the pastel colors, and of course the glitter that was associated with them.  That being said, when my younger daughter wanted to have a unicorn themed birthday party, I was    ALL IN!!!  My mind immediately started whirling with ideas for the decorations!

I started with table decor, and found these adorable plates, napkins, & center pieces at Party City.  The gold square chargers have glitter specks and were a perfect addition.

I made “tails” out of streamers, and tied them to the backs of the chairs.  Of course, the birthday girl got a larger “tail” that included a tulle bow.

Using the same color streamers, I added a little more color with streamers hanging from a beam in the party room.

imgsvr (8)

I found some fun and unique “unicorn names” on Pinterest, so I printed them for the girls to declare their personal “unicorn name”.

I was SOOOOO excited when I found these ceramic unicorns at TJ Maxx.  The pink one is a bank and the white one is a planter.  They were a perfect addition.

At the party entrance, I created a cloud that appeared to be raining.  I used white tissue paper and two iridescent doorway hanging decorations.

imgsvr (18)

Another MUST for a fun party is a photo backdrop.  I created this one with iridescent doorway hanging decorations, then added streamers.  On top, I hung tissue paper flower balls, and the final touch was a sign that read “I believe in unicorns” that I purchased at Party City.  I placed two balloon bouquets on the floor for added color.  During the photo booth pictures, I dumped large trash bags full of blown up balloons on the girls.  They had a blast playing with the balloons.  This created MANY fun photo opportunities!

We played a few games: pin the horn on the unicorn, and a ring toss onto the horn of a unicorn.

A birthday party wouldn’t be complete without dessert!  My daughter wanted an ice cream cake, so I make two unicorn ice cream cakes.  I used a frosting and gold sugar covered ice cream cone as the horn and thin blonde Oreos that I cut into triangles for the ears.

imgsvr

When I created the invitations, I found glitter gold unicorn silhouettes online that I printed.  I used the same silhouettes on the party favor gift tags and unicorn name lists.  I included a fun quote that said, “In a world of horses, be a unicorn”.

I had just as much fun planning this party as the girls had attending it!

imgsvr (20)

Happy birthday party planning!

“Wonder what I will come up with next”…

A GIANT Bean Stalk…

imgsvr (43)

My daughter’s class was reading “Jack and the Bean Stalk”.  As they were reading the book, they were also learning about seed germination.  They started growing their own plants as projects.  These projects, and the process each child completed, were then displayed on poster boards and available for “show” to the parents at open house.

Since this project stemmed from the book, the teacher asked me to create a GIANT BEAN STALK in her room, also to be on display during open house.  OF COURSE, I said YES!!!  Then I began the task of creating the bean stalk in my head.  OH WHAT FUN it is to be a parent at times like this!!!

I started with long strips of green paper.  I measured the distance from the ceiling to the shelf where the bean stalk would rest, and added a few feet.  I used the paper on rolls that all schools have on hand.  I twisted the long strips of paper to create “cords”.  I then twisted the “cords” together and this became the base, or trunk.  I stapled the “cords” in several places so they would stay in together.  I attached the top of the trunk to a rod in the window sill using  large paper clips and binder clips.  The binder clips attached to the top of the trunk, then I looped the paper clips through the metal loop on the binder clip.  The paper clip was then looped over the rod in the window sill.  I taped the trunk to the window in a few places on the backside of the trunk, for stability.

Next, I twisted in more “cords”, but I allowed these to have BIG loops and gaps, so they were loose around the trunk.  I stapled these “cords” where they intersected the trunk.

imgsvr

The next step was creating leaves for the bean stalk.  I used 3 different colors of green construction paper, and cut out a simple leaf shape.  I added lines with a black Sharpie for leaf “definition”.  Then I stapled the leaves all over the trunk.  I added numerous leaves to the top to hide the mounting in the window sill.

Using the rolled green paper, I created “bean pods”, and drew circles with black Sharpie.  I strategically stapled the pods onto the trunk.

This project only took about 2 hours from start to finish, but the impact was HUGE!!!  The kids LOVED their bean stalk and several other teachers at the school commented on it, as well.

imgsvr (43)

Have fun creating your GIANT bean stalk.  I wouldn’t recommend trying to climb it!

“Wonder what I will come up with next”…

Gift Tags from Cards…

img_20190105_152044884

A couple of weeks ago, I posted about repurposing used Christmas cards.  You can also do this with birthday, anniversary, thank you, or any kind of card you have received.  Here I show a Dr. Seuss birthday card that I created a gift tag from.

Supplies needed: used cards, cardstock, paper cutter, glue stick, hole punch, & thin ribbon.

Cut the cardstock slightly larger than the card, glue them together, punch a hole in the corner, and tie it onto a gift.  It’s that simple!

img_20190105_152054359-1.jpg

Be sure to coordinate the wrapping paper and ribbon with the gift tag, for the optimal effect.

Happy cutting.

“Wonder what I will come up with next”…

Frames with Christmas Balls…

OMG!!!  I had the MOST FUN making these gifts for my kids teachers!  Based on the reactions from the recipients, they REALLY LIKED them also!

I realize this is a Christmas decor/gift idea, but I wanted to post it now so that you could be on the hunt for after Christmas sales on ball ornaments.  Now would be a great time to collect the ornaments and make gifts for Christmas this year.  Be sure to purchase balls with color, not just gold & silver, for the perfect effect.

Supplies needed for this project: frames, ball ornaments, wood initial, ribbon (both thin & wide with wire), spray paint, E6000 glue, short zip ties.

For the frames, you can find old beat up ones at yard sales for quite inexpensive.  I also made several from scrap wood that we had at the house.  Either way, spray paint the frames in fun Christmas colors.  Any kind of spray paint will work, so find the least expensive one you can.

Once the frames are dry, tie THIN ribbon strands around the top piece of wood, letting 7 total strands of ribbon hang all the way to the bottom.  This gives you extra ribbon so you can have the perfect length of each ball dangling.  You will want to mix up the lengths as you create your piece of art.  Next, tie the balls onto the ribbon and adjust the ribbon as necessary to get the appropriate varying lengths.  Be sure to triple knot the ribbon on the balls.  Cut the excess ribbon.

img_20190105_160023029

Paint the wood initial in a coordinating color.  Let dry.  Using E6000, glue the ribbon onto the back of the initial and let glue dry.  You may have a better idea on how to attach the initial to the ribbon.  If so, go for it!  Tie the initial on to the top piece of wood, just as you did with the balls.  Adjust the length of the ribbon as necessary.  Once all of the balls and initial are tied on, slide the ribbon to the center of the wood.

For the bow, use a coordinating wired ribbon and create a large full bow.  For bow making steps, look under the section of gift wrapping in my blog.  Attach the bow to the center of the top piece of wood.

To create a hanger on the back, I used small zip ties that I purchased at The Dollar Tree.  I created a small loop around the back of the ribbon, where it is attached to the frame.  Leave the zip tie loop large enough for a wreath hanger to fit through it.  By attaching the zip tie to the ribbon, it allows the ribbon to be shifted as necessary for centering, to the left or right, along the frame when hanging the frame on the wall.

img_20190105_160527730

You are now ready to hang your frame, or gift it to someone special.

Have fun creating!!!

“Wonder what I will come up with next”…

Lip Notes…

Do you, or a loved one travel often?  Show them how much you miss them with “Lip Notes”.

How many of you use lipstick?  Of those, how many “blot” after applying?  You can create “Lip Notes” as you blot.  It’s that simple!

Supplies needed are: Sticky notes, Lipstick, and, of course, your lips.

img_20190104_134627317.jpg

I create “Lip Notes” every time I apply lipstick.  I collect them in my bathroom cabinet so I am armed and ready each time I travel somewhere without my family.

img_20190104_134729699

Right before leaving on a trip, I secretly hide my “Lip Notes” all over the house for my family to find.  I started doing this when my kids were little so they would know I was thinking about them and sending them kisses while I am away.  I even put notes in their suitcases when they are going on a trip without me.

Some of my favorite places to hide them are: on the mirror, on their pillows, by their toothbrushes, on the coffee pot, in their lunch boxes, in a clothes drawer, and in their shoes.  Feel free to be creative with your hiding places!

It doesn’t take long to accomplish, but the end result for your family is ever lasting!

Happy Blotting!

“Wonder what I will come up with next”…


Creating Gift Tags From Christmas Cards…

Have you ever wondered what you should do with all of the GORGEOUS Christmas cards that you receive?  A few years ago, I decided to save them for a future use.  This year I decided to repurpose them as gift tags.  It’s a simple way to recycle something beautiful.

The items you will need: Used Christmas cards, colorful cardstock, paper cutter, glue stick, hole punch, twine or thin ribbon, embellishments, such as rhinestones, and your imagination!

IMG_20181226_203243116

This is my favorite paper cutter!  I’ve had it for years and it works great!

I use colorful cardstock quite frequently and I always save the scraps.

To create gift tags, start by cutting the image on the card you would like to save.  Next, cut a piece of cardstock in a coordinating color.  Be sure to cut the cardstock slightly larger than the image, which will leave a “color” border.  Use a glue stick to attach the image to the cardstock.  Embellish with rhinestones, if appropriate.  Punch a hole in the corner, or center it on the gift tag.  Place a ribbon or piece of twine through the hole and you have created a gift tag!

I haven’t punched the holes and added the ribbon with these, but you can see how fun they are.  If you don’t have used Christmas cards, you can also use festive scrapbook paper for the image.

Happy cutting!

“Wonder what I will come up with next”…

Emoji Birthday Party Fun!

Well, I don’t know about your kids, but my kids have TOTALLY gotten into the Emoji rage!  They have had the MOST FUN with the Poop Emoji!!!  At first, I was totally grossed out by the thought of it, but I have gotten used to it now, and I even have had some fun with it.  When my daughter wanted to have an Emoji themed birthday party, I was ALL IN!

IMG_9016

Of course, I just HAD to wrap her gifts to match the theme of the party!  This was such an easy task to accomplish.  Bright yellow wrapping paper from The Dollar Tree, Goggly Eyes, black and red Sharpies and TAAA DAAA…it’s an Emoji!

The cupcakes were no exception!  I think I had the most fun with these!  Yellow frosting, black and red gel, candy eyes and TAAA DAAA…more Emojis!

We had the party at Boomers, so I wasn’t able to get too crazy with my decorations.  I made centerpieces for the tables with glass bowls, emoji plastic cups filled with green flower foam, topped with yellow basket filler, and some cute Emoji pics, all of which I found at The 99cent Store.  What a bargain!  Notice, I even included the Poop Emoji in a centerpiece!

Fun was had by all at the party and it was a “smily face” good time!  Until next time…

“Wonder what I will come up with next”…


It’s a Jungle Out There! Safari Themed School Carnival…

Heading up the decorating team for the school carnival this year was no small animal.  I, of course, couldn’t help myself from taking a walk on the wild side and going overboard!  The team and I didn’t monkey around when it came to creating a safari themed atmosphere!

081

Would you like to go on a safari? Let me take you on a trip.  Let’s start at the entrance to the Safari.  The school has a Knight mascot and PTA years ago created a rock castle wall to use as carnival decorations.  We draped green and brown paper vines through the castle wall with paper monkeys, sloths, and tucans hanging from the vines.  The 1st grade classes had done a rain forest lesson, so we displayed the students paper animals.  It was fun to watch the kids reactions to seeing their creations on display.

083

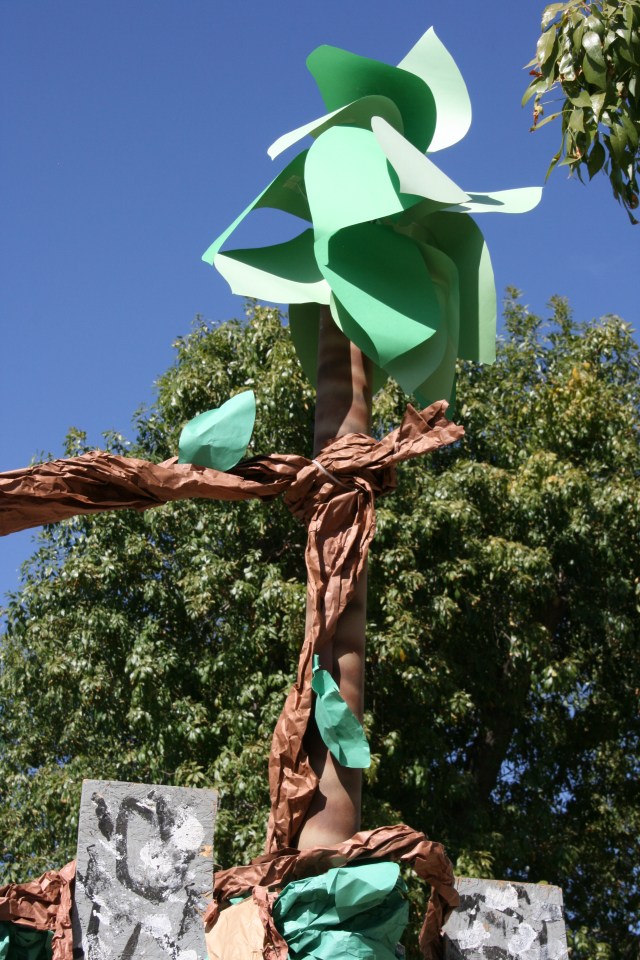
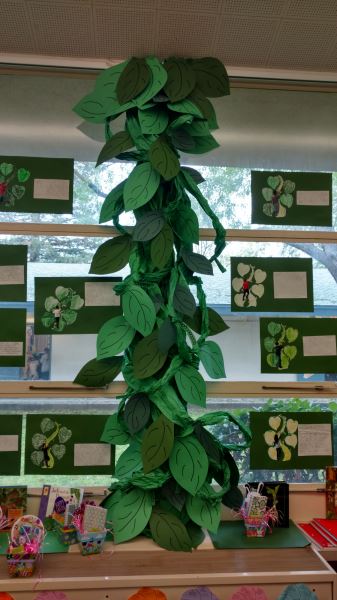
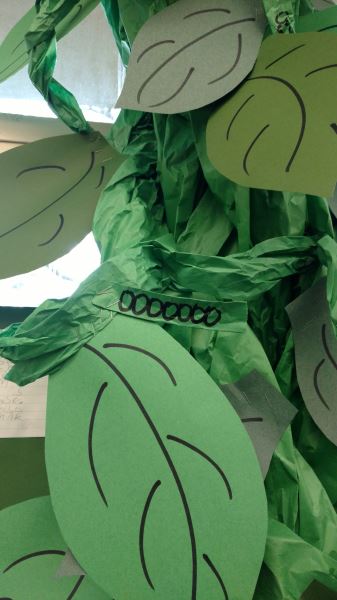
I created the tall trees by spray painting carpet rolls and adding leaves.  To make the leaves, I cut out shapes from different shades of green construction paper.  I then taped a long piece of wire to one side of the paper.  At the top of the carpet roll, I shoved in a piece of floral foam and pierced the leaf wires into the foam.

069

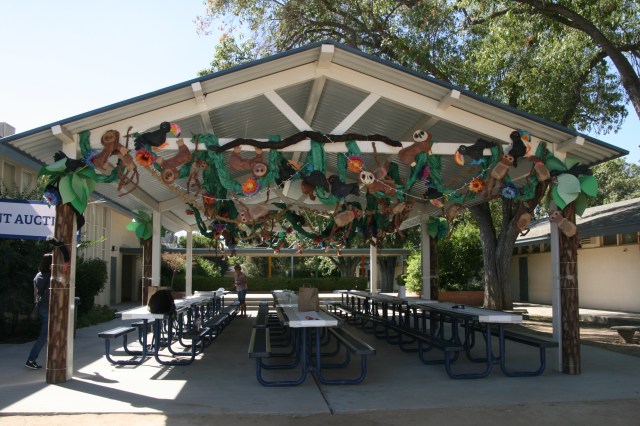
Next, we come to the main table area, which was turned into a jungle by drooping green vines throughout.  Again, we hung students paper animals from the vines, as well as tissue paper flowers made by a team member and a few cobras that I created.

These cobras were created using girls diamond print knit tights.  I cut the tights in half, and re-sewed them together length wise to get a VERY long tube of tights.  I stuffed the tights with old magazines, sewed on beads for eyes, and a piece of red felt for the tongue.  The snake on the left is wrapping around another tree I created.

We hung strings of white lights, and a team member added tan cupcake papers to each light.  They looked like strings of paper lanterns.

053

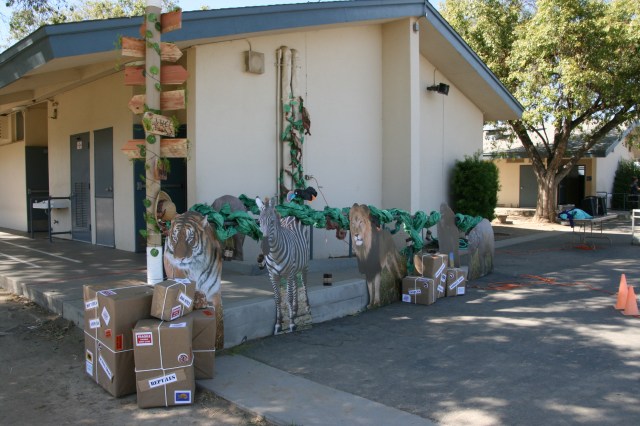
Moving towards the cake walk area, we had animal cut outs that I purchased at Walmart.com.  A team member created “madagascar” type boxes tied with white twine and stickers.  The same team member created amazing wood pole signs.

058

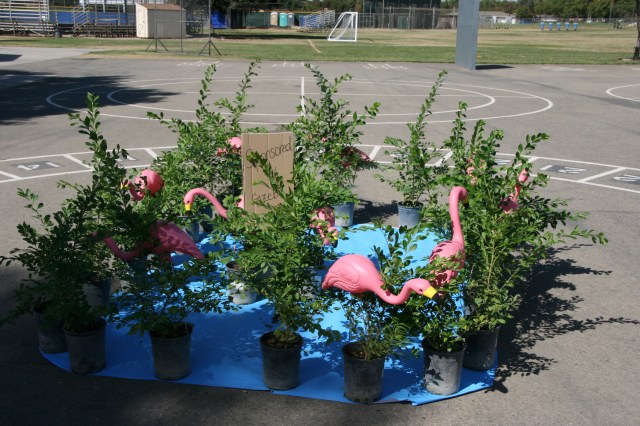
In the center of the cake walk, I created a pond, with blue paper, plants borrowed from a local nursery, and plastic flamingos.

059

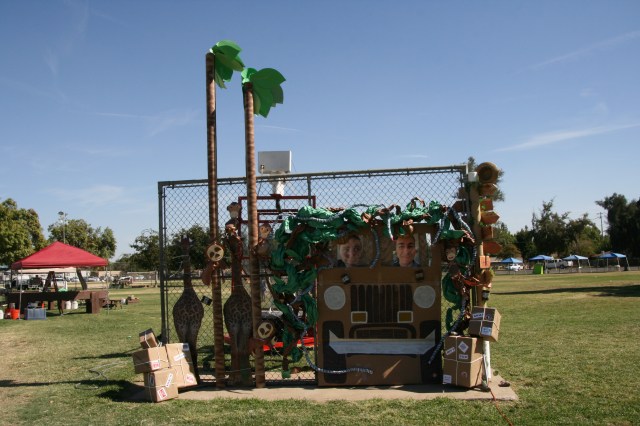
This might have been the highlight for the students, along with the “royal flush game”!  I created a cardboard safari jeep and zip tied it to a chain link fence.  Driving the safari jeep was a picture of the school principal, and the vice principal was his passenger.  This display included green vines, students paper animals, & snakes made from paper and snake print duct tape I found at The Dollar Tree.  More carpet roll trees, animal cutouts, boxes, and another wood pole sign to complete the display.

The safari jeep was such a hit, that it still remains in the school cafeteria stapled to the wall!

I hope you enjoyed your safari ride!  Happy “animaling” around!

“Wonder what I will come up with next”…

Simple Baby Shower Decorations…

My oh my, how I love planning parties!  I will gladly plan a party any day!  My manager is pregnant and we decided to have a simple baby shower for her at our district meeting.  Of course, I volunteered to be in charge of it!  BIG SURPRISE, I know!  Since we were gathering for a meeting, not a baby shower, I needed to keep it VERY simple.

img_20161206_095540937

Since my manager doesn’t know what she is having, I needed it keep it neutral colors.  I created 2 “clothes lines” out of lime green tulle and hung some sleepers, diapers, stuffed animal and booties from them.  I also created paper “blocks” that spelled out “baby”.  I used command hooks to tie the tulle to so I didn’t leave holes in the conference room walls.

img_20161206_095436216

img_20161206_095549595

I used lime green, dark grey and white card stock to create the “blocks”.  I cut the lime green paper 6×6″, dark grey 5×5″, and the white 4×4″, then glued them together with a glue stick.  I added lime green adhesive letters and adhesive rows of lime green plastic beading that I purchased at Hobby Lobby.

img_20161206_095729861

I filled a few newborn size diapers with snacks and tied a lime green tulle bow around them.  I placed these on the center of the conference table.

img_20161206_095749724

I placed 12×12″ lime green and dark grey cardstock under a cupcake stand for color.  This had a nice effect when you looked at the cupcake display.  I wrapped her gift in coordinating colors, as well.  Although it was simple, it was very cute.  She was surprised when she entered the conference room.

Welcome baby, very soon!

“Wonder what I will come up with next”…